创建自定义布局有着直接的要求,但实现细节的过程可能会有所不同。你的布局对象需要为collection view包含的所有视图创建布局属性对象,这些属性对象的创建顺序视具体的应用程序而定。对于包含上千个item的collection view,事先计算和缓存布局属性是一个很耗时的过程,所以更有意义的做法是只有特定item被请求时才创建布局属性。然而对于仅包含若干个item的collection view,事先计算好所有的布局信息并放入缓存,而不是只有特定item被请求时才创建布局属性,会节省许多不必要的重复计算。本章的例子属于第二类。
请记住,所提供的示例代码不是创建自定义布局的唯一方法。在你开始创建自定义布局之前,花点时间来设计一个实现结构,这样可使应用程序能够获得最佳性能。创建自定义布局的概念性概述,请参考see Creating Custom Layouts。
因为本章例子用了一个特定的顺序来实现自定义布局,因此自上而下阅读代码时请记住这个顺序是有着目的性的。这个例子的目标是实现自定义布局,而不是实现一个app。因此,实现最终的视图或者控制器的代码并未提供。在该布局中,使用了custom collection view cells 作为它的 cells ,并且使用自定义视图来创建连接线来连接这些cells。为collection views创建自定义单元格和视图,以及如何使用collection views,在前几章中已有说明。请参考Collection View Basics 和 Designing Your Data Source and Delegate。
The Concept (概念)
本例子的目的是为了实现一个如图6-1所示的继承树。示例提供的代码片段伴有注释。这个collection view中每个section,代表着整个tree的深度:Section 0 只包含了标签为 NSObject的cell,Section 1 包含了标签为 NSObject的所有子cell,Section 2 包含了Section 1中某个cell的所有子项,依次类推。每个cell都是自定义的,包含了指示类名的label,还有连接cell的supplementary views。由于connector view class需要知道去绘制多少条线段,因此它需要获取data source中的信息。因此,实现这些连线作为补充视图,而不是装饰视图是有意义的。

Initialization
创建自定义布局的第一步,是创建UICollectionViewLayout的子类,这是创建自定义布局的必要基础。
对于这个例子来说,创建自定义protocol是很有必要的,它可以标明特定item之间的间距。如果特定的某个item需要从data source中获取额外信息,那么最好的做法是实现一个protocol,而不是直接连接data source。这样一来你的布局将会更加健壮,更加具有可重用性;它将不再与data source耦合,而是会对任何实现protoco的对象做出响应。
Listing 6-1展示了 custom layout 头文件的必要代码。现在,任何实现了 MyCustomProtocol 协议的类都可以使用custom layout,而custom layout也可以请求实现 MyCustomProtocol 协议的类的相关信息。
Listing 6-1 Connecting to the custom protocol
1 | @interface MyCustomLayout : UICollectionViewLayout |
接下来,由于我们的collection view需要处理的items数量相对较少,因此自定义布局使用缓存系统来存储布局属性,布局属性会在准备布局时生成,当collection view请求这些属性时可以检索到存储的这些值。Listing 6-2展示了3个私有属性和一个init方法,layoutInformation字典存储了collection view所有类型的视图的布局属性,maxNumRows用来跟踪我们的tree中最高那一列有多少行,insets对象用来控制cells的间距,以及设置视图的frames和内容大小。前两个属性的值是在准备布局时设置,而insets对象的值是在init方法中设置。在本例中,INSET_TOP, INSET_LEFT, INSET_BOTTOM, INSET_RIGHT是你为UIEdgeInsetsMake每个参数定义的常量。
Listing 6-2 Initializing variables
1 | @interface MyCustomLayout() |
自定义布局的最后一步是创建自定义布局属性。尽管这一步不总是必须得,但在本例中,对于已经放置好的cells,代码需要访问他们子cells的index paths,以便于调整子cells的frames来与父cell相匹配。因此我们创建一个UICollectionViewLayoutAttributes的子类,用数组来存储某个cell的所有子cells相关信息。在你的UICollectionViewLayoutAttributes子类的头文件中,添加如下代码:
1 | @property (nonatomic) NSArray *children; |
就如UICollectionViewLayoutAttributes语言参考中所解释的那样,iOS 7以及之后的版本,实现layout attributes子类需要重写isEqual:方法。想了解更多信息为何这么做,请参考UICollectionViewLayoutAttributes Class Reference。
在本例中实现isEqual:方法十分简单,因为只有一个字段需要比较,即children数组的内容。如果两个layout attributes相匹配,那么他们必然相等,因为children只能被一个class拥有。 Listing 6-3展示了isEqual:方法的实现。
Listing 6-3 Fulfilling requirements for subclassing layout attributes
1 | -(BOOL)isEqual:(id)object { |
记住在自定义布局类中include自定义布局属性的头文件。
至此,你已经准备好了自定义布局的基础信息,接下来可以实现布局主体功能了。
Preparing the Layout
现在,所有必要的组件有已经初始化,您可以准备开始布局了。在布局过程的第一步,collection view会调用prepareLayout方法。在本例中,prepareLayout方法用来生成所有视图的layout attributes对象的实例,并储存在layoutInformation字典中以供稍后使用。想了解更多prepareLayou的内容,请参考Preparing the Layout。
Creating the Layout Attributes
示例中实现prepareLayou方法可分为两部分。图6-2展示了方法前半部分的目的,代码中遍历了所有cells,如果这个cell含有children,那么把所有子cells与该父cell相关联。就如您看到的插图那样,这个过程会处理所有cells,包那些括子cell却是另一部分cells的父cell。
Figure 6-2 Connecting parent and child index paths
Listing 6-4 展示了prepareLayout方法的前半部分。代码开始部分的两个可变数组构成了缓存机制的基础部分:第一个layoutInformation等同于局部的layoutInformation属性。创建一个局部可变副本,可使实例变量改为不可变。这么做是有意义的,因为布局属性在prepareLayout方法执行完毕之前是不允许修改的。然后,代码遍历每个section,在每个section中又遍历该section的每个item,并为每个item创建属性。自定义方法attributesWithChildrenForIndexPath:返回一个自定义布局属性对象的实例,该实例中children属性填充了当前item的所有子项,每个子项都指定了相应的index paths。
原文:returns an instance of the custom layout attributes, with the children property populated with the index paths of the children for the item at the current index path
这新属性随后被存储在cellInformation这个局部字典变量里面,并把index path作为字典的key。这个初始部分,略过了所有item在设置他们的frame之前,需要设置他们children的部分。
原文:The attributes object is then stored within the local cellInformation dictionary with its index path as the key. This initial pass over all of the items allows the code to set the children for each item before setting the item’s frame
Listing 6-4 Creating layout attributes
1 | - (void)prepareLayout { |
Storing the Layout Attributes
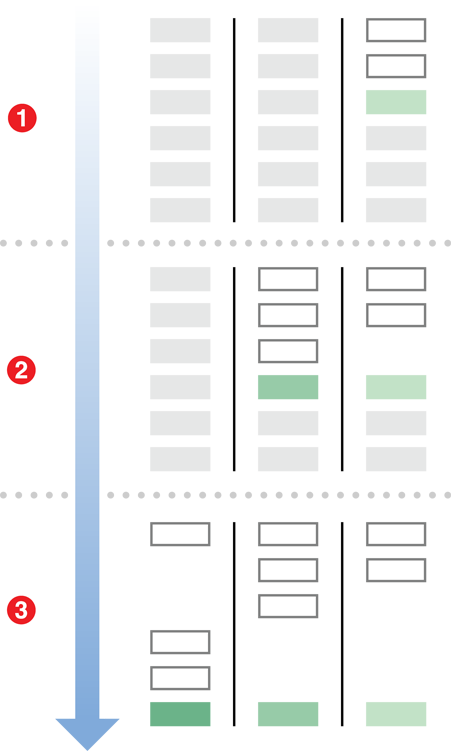
图6-3描绘了prepareLayout方法后半部分的内容:从最后一行向顶端依次创建tree的层次结构。
译者注:此处描述我认为有误,原文是Figure 6-3 depicts the process that occurs in the second half of the prepareLayout method in which the tree hierarchy is built from the last row to the first,但稍后代码可以看到并不是这样,我认为原文中from the last row 应该是from the last column,即:从最后一列向前依次创建tree的层次结构)
这种方法可能乍一看上去有些古怪,但它事实上是一种巧妙的方法,能够降低调整cell frame的复杂度。之所以巧妙,是因为子cell的frame需要匹配它们的父cell,同时也是因为各行cell的间隔距离是基于每个cell包含多少个子cell而定的(包括子cell包含多少孙cell等等)。因此,你需要先设置子cell的frame,然后再设置父cell的frame。这样一来,子cell以及包含的孙cell的frame,便可匹配它们的父cell。
这长难句,难过考研英语了:Because the frames of children cells need to match up with those of their parent, and because the amount of space between cells on a row-to-row basis is dependent upon how many children a cell has (including how many children each child cell has and so on), you want to set the child’s frame before setting the parent’s. In this way, the child cell and all of its children cells can be adjusted to match their overall parent’s cell.
第一步:最后一列的cells顺序摆放。第二步,由布局对象决定第二列的frame。在第二列,前几个cells由于没有子cell,所以可以顺序摆放。然而,第三列中的绿色cell的frame必须与第二列中它的父cell相匹配,所以她下一一格。第三步,摆放第一列的cell。由于第二列中前3个cell,是第一列第一行cell的子项,因此第一列中第二行及以后的所有cell都要下移。其实没有必要非得这么做,因为第一列的第2、3行cell并没有它们自己的子cell,但布局对象可没那么聪明。相反,布局对象总是调整拥有子cell的那一行下面的所有cell的frame。同样的,第2、3列绿色cell也要下移来对应各自的父cell。
这段太难翻译了,体验一下吧:In step 1, the cells of the last column have been placed in sequential order. In step 2, the layout is determining the frames for the second column. In this column, the cells can be laid out sequentially since no cell has more than one child. However, the green cell’s frame must be adjusted to match that of its parent cell, so it is shifted down one space. In the final step, the cells for the first column are being placed. The first three cells of the second column are the children of the first cell in the first column, so the cell’s following the first cell in the first column are shifted down. In this case, it is not actually necessary to do so since the two cell’s following the first have no children of their own, but the layout object is not smart enough to know this. Rather, it always adjusts the space in case any cell following one with children has children of its own. As well, the green cells have now both shifted down to match that of their parent.
Figure 6-3 The framing process
Listing 6-5展示了prepareLayout方法的后半部分:为每个item设置frame。标有数字的注释,稍后会看到解释。
Listing 6-5 Storing layout attributes
1 | //continuation of prepareLayout implementation |
在6-5中,代码降序遍历所有sections,由后至前创建tree。totalHeight变量表示当前item之下需要多少行。这个实现无法聪明的计算出空间,只是简单的在包含子项的cell下面留下空白区域,这样一来子项永远不会重叠。代码实现遵从如下顺序:
- 在设置cell的frame之前,可以从局部字典变量中获取布局属性数据,这一部分内容应该在
prepareLayout方法的前半部分创建完毕。 - 自定义
adjustFramesOfChildrenAndConnectorsForClassAtIndexPath方法,用递归调整所有cell的子项、孙子项等等的frame,使它们和父项能够对应。 - 把调整后的属性放回字典之后,调整
totalHeight变量,使该变量可以反映出下一项的frame从哪里开始。此处正是自定义protocol的用武之地,任何实现自定义protocol的对象必须实现numRowsForClassAndChildrenAtIndexPath:方法,该方法返回这个类所代表的cell需要占多少行,即它包含多少个子项。 maxNumRows属性(稍后用它设置内容区域大小)被设置为section 0的总高度。最高那一列总是section 0,它的高度会调整为可容纳所有子cell,不要忘记这个实现并不能聪明的实现间距调整。- 方法结束时,在局部字典变量
layoutInformation中,插入一个包含所有cell属性的字典,并用一个唯一的字符串标识符作为key。
最后一步的字符串表标识符,接下来将会用于获取cell的相应属性。在接下来的示例中,随着加入supplementary views,这个表标识符将会愈加重要。
Providing the Content Size
在preparing the layout章节中,maxNumRows属性被设置为包含最多项的section的行数。此信息可以被用来设置内容区域大小,这正是布局过程中下一步需要做的。 Listing 6-6 展示了如何实现collectionViewContentSize。其中用到的ITEM_WIDTH 和 ITEM_HEIGHT 常量,应在项目全局区域中进行预定义(比如,它们可用于自定义cell,可以依照这两个常量来计算出label的正确尺寸)。
Listing 6-6 Sizing the content area
1 | - (CGSize)collectionViewContentSize { |
Providing Layout Attributes
当所有的布局属性对象的初始化和缓存之后,代码已为layoutAttributesForElementsInRect:方法准备好了所有的布局信息。该方法是布局过程中的第二步,就像prepareLayout方法一样,是必须实现的方法。该方法提供了一个矩形区域,期望可以返回一个矩形区域内各类视图的所有布局属性组成的数组。在某些情况下,那些包含上千项的collection views可能一直等待到该方法被调用,才会初始化矩形区域内元素的布局属性对象,但本例还是采用了事先缓存布局属性对象的方式。因此,layoutAttributesForElementsInRect方法中仅仅是简单的遍历所有已存储得属性,并把它们汇聚在一个数组中返回给调用方。
Listing 6-7 展示了layoutAttributesForElementsInRect方法的实现代码。代码首先遍历主字典_layoutInformation中的所有子字典(subdictionaries),每个子字典都和相应种类的视图一一对应。之后遍历这些字字典中的所有布局属性对象,当检测到这些布局属性的frame实在给定矩形区域之内,则把这个布局属性对象添加到一个数组中(该数组用来存储矩形区域内所有布局属性对象),当所有布局属性对象全部检测完毕,返回这个数组。
Listing 6-7 Collecting and processing stored attributes
1 | - (NSArray*)layoutAttributesForElementsInRect:(CGRect)rect { |
注:实现
layoutAttributesForElementsInRect:方法时无需考虑特定属性对应的视图是否可见。请记住,该方法所提供的矩形并不一定是可见的矩形,因此不管你如何实现,都不应该假设返回的仅仅是可见视图的属性。想了解layoutAttributesForElementsInRect:方法的更多信息,请参考 Providing Layout Attributes for Items in a Given Rectangle。
Providing Individual Attributes When Requested
Providing Layout Attributes On Demand章节已经讨论过,布局过程完成后,布局对象应该时刻准备着提供collection view 中任何类型视图的任何一个布局属性对象。一共有3个方法,可以针对3中不同类型的视图:cells, supplementary views and decoration views。但在当前示例中,我们只会用到cells对应的方法,所以此刻我们只需实现layoutAttributesForItemAtIndexPath:方法即可。
Listing 6-8展示了如何实现该方法:他进入存储cell的字典(译者注:通过Listing 6-5的注释5提到的字符串标识符来获取子字典),返回在子字典中找到key为indexPath的那个布局属性对象。
Listing 6-8 Providing attributes for specific items
1 | - (UICollectionViewLayoutAttributes *)layoutAttributesForItemAtIndexPath:(NSIndexPath *)indexPath { |
图 6-4 展示了现在的当前布局的呈现效果,所有的cell都已呈现,并和父cell对应,但并未绘制它们之间的连线。
Figure 6-4 The layout so far
Incorporating Supplementary Views
截止目前,所有cell都能够分层展示,但由于没有绘制父子连线,这个类图是很难理解的。要实现绘制连线部分,应用程序需要创建一个自定义视图,并将其纳入到布局中作为supplementary view。要了解更多信息,请参考 Elevating Content Through Supplementary Views。
Listing 6-9列出的几行代码,可以放入prepareLayout方法中,用以包含 supplementary views。与创建cell的布局属性对象稍有不同,创建supplementary view的布局属性对象时,需要一个字符串标识符,来指示要创建哪种supplementary view的布局属性对象。这是因为自定义布局可以包含多种类型的supplementary view,但只能包含一种cell。
Listing 6-9 Creating attributes objects for supplementary views
1 | // create another dictionary to specifically house the attributes for the supplementary view |
由于创建supplementary view布局属性的代码和创建cell布局属性对象的代码十分相似,此处仅简单描述了实现prepareLayout方法相应的代码。代码采用的缓存机制和cell相同,用了另外一个字典来存储标识符为ConnectionViewKind的supplementary view的布局属性对象。如果您需要创建更多的supplementary view,可以创建更多的字典,使用相同的代码(不同的标识符)来创建。但是在本例中,仅仅需要一种supplementary view。正如代码所示那样,初始化布局属性对象采用了自定义方法frameForSupplementaryViewOfKind:AtIndexPath:,用来决定supplementary view的frame。请记住出现在prepareLayout方法方法中的frameForSupplementaryViewOfKind:AtIndexPath:,需要合并所有supplementary views。
当前示例无需更改layoutAttributesForElementsInRect:已有的实现代码,因为layoutAttributesForElementsInRect:方法已经被设计为在遍历主字典中存储的所有属性。supplementary view的布局属性也被添加到了这个主字典中,因此该方法仍然可以正常工作。
最后,就像cell那样,collection view可能随时请求supplementary view的布局属性对象。因此,必须实现layoutAttributesForSupplementaryElementOfKind:atIndexPath:方法。
Listing 6-10 展示了如何实现该方法,和layoutAttributesForItemAtIndexPath:的实现方法基本相同。只有一个例外,就是使用提供的kind字符串来替代硬编码,这样你的布局就可以提供任何类型的supplementary view布局属性对象。
Listing 6-10 Providing supplementary view attributes on demand
1 | - (UICollectionViewLayoutAttributes *) layoutAttributesForSupplementaryViewOfKind:(NSString *)kind atIndexPath:(NSIndexPath *)indexPath { |
Recap
通过包含supplementary views,您现在拥有了一个布局对象,可以充分地再现类层次结构图。在最终的实施中,您可能希望调整您的自定义布局以节省空间。该示例展示了如何实现一个真实的自定义布局。Collection views是如此的强大,提供了如此多的能力,远超此处看到的内容。当做移动、插入或者删除操作时,突出显cell示或者改变cell选中状态(甚至动画)都是很容易实现的功能,并且可以方便的集成到你的应用程序当中。要把你的自定义布局带入更高的级别,请查看Creating Custom Layouts的最后几节。
补充
官方提供的这份文档,代码并没有给全,随后我将根据这份文档实现一个完整的布局,并会上传值Github,敬请期待。